參考網友所發佈的文章「Make Your Game Look The Same All Mobile Screen Sizes - Unity」,實際在範例專案中修改並測試,可以耶...實作測試如下:
(1) 確定基本參考解析度(本例:iPhone 7 plue (1080x1920),且相關「固定位置」的 GameObject Sprite 物件都就定位後...
(2) 編輯 Camera Viewport Handler (Script) 程式元件
在 Assets 中加入 C# 程式,並命名為 CameraViewportHandler.cs
程式內容如下:
using UnityEngine;
[ExecuteInEditMode]
[RequireComponent(typeof(Camera))]
public class CameraViewportHandler : MonoBehaviour
{
public enum Constraint { Landscape, Portrait }
#region FIELDS
public Color wireColor = Color.white;
public float UnitsSize = 1; // size of your scene in unity units
public Constraint constraint = Constraint.Portrait;
public static CameraViewportHandler Instance;
public new Camera camera;
public bool executeInUpdate;
private float _width;
private float _height;
//*** bottom screen
private Vector3 _bl;
private Vector3 _bc;
private Vector3 _br;
//*** middle screen
private Vector3 _ml;
private Vector3 _mc;
private Vector3 _mr;
//*** top screen
private Vector3 _tl;
private Vector3 _tc;
private Vector3 _tr;
#endregion
#region PROPERTIES
public float Width
{
get
{
return _width;
}
}
public float Height
{
get
{
return _height;
}
}
// helper points:
public Vector3 BottomLeft
{
get
{
return _bl;
}
}
public Vector3 BottomCenter
{
get
{
return _bc;
}
}
public Vector3 BottomRight
{
get
{
return _br;
}
}
public Vector3 MiddleLeft
{
get
{
return _ml;
}
}
public Vector3 MiddleCenter
{
get
{
return _mc;
}
}
public Vector3 MiddleRight
{
get
{
return _mr;
}
}
public Vector3 TopLeft
{
get
{
return _tl;
}
}
public Vector3 TopCenter
{
get
{
return _tc;
}
}
public Vector3 TopRight
{
get
{
return _tr;
}
}
#endregion
#region METHODS
private void Awake()
{
camera = GetComponent<Camera>();
Instance = this;
ComputeResolution();
}
private void ComputeResolution()
{
float leftX, rightX, topY, bottomY;
if (constraint == Constraint.Landscape)
{
camera.orthographicSize = 1f / camera.aspect * UnitsSize / 2f;
}
else
{
camera.orthographicSize = UnitsSize / 2f;
}
_height = 2f * camera.orthographicSize;
_width = _height * camera.aspect;
float cameraX, cameraY;
cameraX = camera.transform.position.x;
cameraY = camera.transform.position.y;
leftX = cameraX - _width / 2;
rightX = cameraX + _width / 2;
topY = cameraY + _height / 2;
bottomY = cameraY - _height / 2;
//*** bottom
_bl = new Vector3(leftX, bottomY, 0);
_bc = new Vector3(cameraX, bottomY, 0);
_br = new Vector3(rightX, bottomY, 0);
//*** middle
_ml = new Vector3(leftX, cameraY, 0);
_mc = new Vector3(cameraX, cameraY, 0);
_mr = new Vector3(rightX, cameraY, 0);
//*** top
_tl = new Vector3(leftX, topY, 0);
_tc = new Vector3(cameraX, topY, 0);
_tr = new Vector3(rightX, topY, 0);
}
private void Update()
{
#if UNITY_EDITOR
if (executeInUpdate)
ComputeResolution();
#endif
}
void OnDrawGizmos()
{
Gizmos.color = wireColor;
Matrix4x4 temp = Gizmos.matrix;
Gizmos.matrix = Matrix4x4.TRS(transform.position, transform.rotation, Vector3.one);
if (camera.orthographic)
{
float spread = camera.farClipPlane - camera.nearClipPlane;
float center = (camera.farClipPlane + camera.nearClipPlane) * 0.5f;
Gizmos.DrawWireCube(new Vector3(0, 0, center), new Vector3(camera.orthographicSize * 2 * camera.aspect, camera.orthographicSize * 2, spread));
}
else
{
Gizmos.DrawFrustum(Vector3.zero, camera.fieldOfView, camera.farClipPlane, camera.nearClipPlane, camera.aspect);
}
Gizmos.matrix = temp;
}
#endregion
} // class
(3) 編輯 Anchor Game Object (Script) 程式元件
在 Assets 中加入 C# 程式,並命名為 AnchorGameObject.cs
程式內容如下:
using UnityEngine;
using System.Collections;
[ExecuteInEditMode]
public class AnchorGameObject : MonoBehaviour
{
public enum AnchorType
{
BottomLeft,
BottomCenter,
BottomRight,
MiddleLeft,
MiddleCenter,
MiddleRight,
TopLeft,
TopCenter,
TopRight,
};
public bool executeInUpdate;
public AnchorType anchorType;
public Vector3 anchorOffset;
IEnumerator updateAnchorRoutine; //Coroutine handle so we don't start it if it's already running
// Use this for initialization
void Start()
{
updateAnchorRoutine = UpdateAnchorAsync();
StartCoroutine(updateAnchorRoutine);
}
/// <summary>
/// Coroutine to update the anchor only once CameraFit.Instance is not null.
/// </summary>
IEnumerator UpdateAnchorAsync()
{
uint cameraWaitCycles = 0;
while (CameraViewportHandler.Instance == null)
{
++cameraWaitCycles;
yield return new WaitForEndOfFrame();
}
if (cameraWaitCycles > 0)
{
print(string.Format("CameraAnchor found CameraFit instance after waiting {0} frame(s). " +
"You might want to check that CameraFit has an earlie execution order.", cameraWaitCycles));
}
UpdateAnchor();
updateAnchorRoutine = null;
}
void UpdateAnchor()
{
switch (anchorType)
{
case AnchorType.BottomLeft:
SetAnchor(CameraViewportHandler.Instance.BottomLeft);
break;
case AnchorType.BottomCenter:
SetAnchor(CameraViewportHandler.Instance.BottomCenter);
break;
case AnchorType.BottomRight:
SetAnchor(CameraViewportHandler.Instance.BottomRight);
break;
case AnchorType.MiddleLeft:
SetAnchor(CameraViewportHandler.Instance.MiddleLeft);
break;
case AnchorType.MiddleCenter:
SetAnchor(CameraViewportHandler.Instance.MiddleCenter);
break;
case AnchorType.MiddleRight:
SetAnchor(CameraViewportHandler.Instance.MiddleRight);
break;
case AnchorType.TopLeft:
SetAnchor(CameraViewportHandler.Instance.TopLeft);
break;
case AnchorType.TopCenter:
SetAnchor(CameraViewportHandler.Instance.TopCenter);
break;
case AnchorType.TopRight:
SetAnchor(CameraViewportHandler.Instance.TopRight);
break;
}
}
void SetAnchor(Vector3 anchor)
{
Vector3 newPos = anchor + anchorOffset;
if (!transform.position.Equals(newPos))
{
transform.position = newPos;
}
}
#if UNITY_EDITOR
// Update is called once per frame
void Update()
{
if (updateAnchorRoutine == null && executeInUpdate)
{
updateAnchorRoutine = UpdateAnchorAsync();
StartCoroutine(updateAnchorRoutine);
}
}
#endif
}
(4) 在 Main camera 物件內加入 Camera Viewport Handler (Script) 程式元件,並勾選「Execute In Update」以在 Unity 設計工具中「所見即得」,即時看到調整參數後的變化.然後,調整 Units Size 參數,讓 Sprite 元件全縮入Camera 的框框範圍.
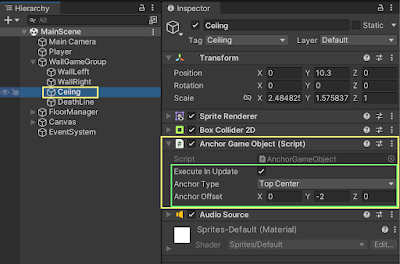
(5) 在 WallGameGroup、WallLeft、WallRight、Ceiling、DeathLine 物件中加入 Anchor Game Object (Script) 程式元件,並勾選「Execute In Update」以在 Unity 設計工具中「所見即得」,即時看到調整參數後的變化.然後,調整個物件中 Anchor Game Object (Script) 元件內的 Anchor Type 與 Anchor Offset 參數,以符合並固定在 Camera 範圍中.
PS.注意 Wall 以 WallGameGroup 作為群組後的佈局方式,這是重點...
(6) 測試看看,改選擇 Redmin 10 (1080x2400)


